Technical Considerations of the Pixilation Shoot
A Technical Description of the Workflow and Tools Used During the Chroma Key Trouble With Unicorns Introduction Shoot
The Pixilation Shoot
On Saturday 2006-11-04, the first shoot of the Trouble With Unicorns took place. This was for the opening sequence of the project, which is in a 2D-animation visual style. Instead of characters made of cutout paper or other materials, (which might be seen as the traditional 2D animation style), this sequence is going to have live people animated in a stop-motion animation technique called pixilation. This will give the characters the surface appearance of being real, but since they are 'pixilated,' their motions will be interrupted and jagged, giving them an animated aesthetic. The characters were captured performing their motions in front of a chroma screen, so that they can be "cut out" and composited in with backgrounds at a later point in the post-production process.
Technical Considerations of Chroma Key Shooting
Here is a still of our makeshift chroma keying setup.
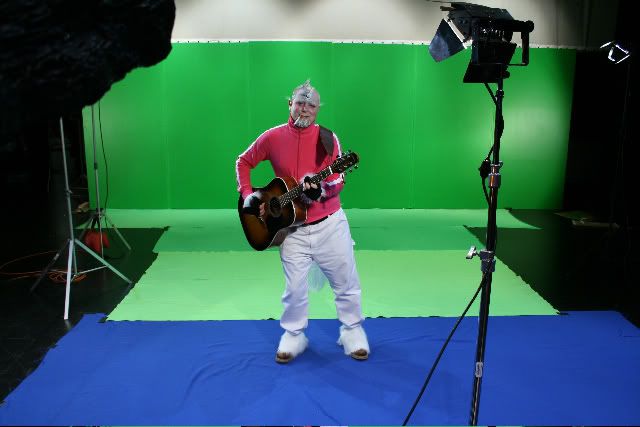
The large green wall you see in the background is actually 6 flats (pieces of plywood stood upright and screwed to stands) taped together. We painted the flats with near chroma-green paint from Ace Hardware. On commercial film sets, chroma screens are often painted with special chroma paint. This usually costs about 60 to 70 dollars per gallon. For the budget-minded individual, one could acquire near-equivalent chroma green paint from your nearest hardware store, for much less money. The amount of gloss on the paint that you buy can be an important consideration. If you buy high-gloss paint, you will get reflections and glare on the surface of your green-screen, which should be avoided at all costs. You might also get an increase in green light bounced back at your actors, which should also be avoided. A full matte green paint on the other hand, might bring about an increase in the amount of light necessary to illuminate the green screen easily. Taking into account these considerations, we decided to get one step above matte in the "matte-to-gloss" scale, which at the hardware store we went to was termed "eggshell gloss".
You might also notice that our actor is standing on a wrinkled combination of clothes... er, cloths. Yes. These clothes represent somewhat a range of colors, from darker green to lighter green to blue. Contrary to what might seem wrong at first, you can actually key two colors (green and blue) simultaniously, fairly effectively. While not desirable, as this adds more complexity to the post-production workflow, it can be effective. We were forced to resort to it in our case, where we were running out of time, and had to find many strips of cloth to put on the floor for keying.
You might notice in the above screenshot that our actor is very far away from the chroma green wall. We did this so that we would get as little 'spill' as possible. Spill is green (or blue) light reflected back from the chroma screens onto the subject, and can create difficulties with color corection in post, or even unusable footage. Lighting is very important in Chroma Key shooting. There is constant battle between even lighting on the chroma screens, and shadows cast onto the chroma screens by the subjects. It is difficult to maintain a balance between even lighting on the screens and desireable lighting on the actors. There are a list of tips for chroma key shooting, that interested readers might peruse.
Technical Considerations of Image Capture
Shooting in the style of pixilation brings about unique challenges for the actor. Essentially, you are using people as puppets. Unlike puppets, people can move themselves. Also unlike puppets, people are more difficult to pose and leave in one position, because they tire easily. Therefore, when shooting pixilation, it is best if the actor has to pause and hold one position as little as possible. For the shoot we were able to acquire a Canon Digital Rebel XTi (400d), from the excellent independent filmmaker's resource, Costco. Our initial plan was to shoot in Canon's digital RAW format, so as to preserve as much of the color information as possible. However, we ended up shooting at the highest resolution JPEG setting instead, for the majority of the shoot. The Digital Rebel XTi can shoot at 3 frames per second, until its memory buffer fills, and it gets behind in writing the data to the Compact Flash card. When shooting raw files, the buffer can hold 10 images before it fills. When shooting Jpeg (large/fine), the buffer can hold 27 images. To shoot in RAW would have put significant strain on our actors, because every 10 frames, they would have to freeze mid-motion and hold their position until the buffer filled.
When shooting for chroma key (see discussion below), color information is just as important as luminance, or brightness information. Most video codecs (DV, for example), and the JPEG still image compression algorithms, apply a method of compression known as Chroma Subsampling. This is basically a technique of compressing the color information more than the brightness information, because our eyes are less sensitive to a loss of detail in the colorspace of an image than in the luminance-space. DV has a Chroma Subsampling Rate of 4:1:1. JPEG has an inferior chroma subsampling rate of 4:2:0, which basically means that there is half as much resolution both horizontally and vertically in the color information. The RAW format has no color compression at all, and thus its effective chroma subsampling rate is 4:4:4, meaning that there is no compression of the color channel.
What does all this mean for Chroma Keying? This means that if we were shooting at SD resolution (720x480 pixels), in the JPEG format, our effective image resolution for keying would actually be half of that (360x240). This would result in a rather blocky key!
Since an 8-bit Morgan the Unicorn is not our goal, it is fortunate that the Rebel XTi can shoot at 10 Megapixels of Resolution, which comes out to 3,888x2592 pixels, which is about equivalent to the 4K standard resolution that Film Studios scan 35mm film at for digital intermediates. Because our final output format for this sequence is going to be HD 1080p24 resolution (with eventual down-conversion to 480p24 to mesh with the remainder of the project, which will be shot on the Panasonic DVX100A), we reasoned that even with the 1/2 effective resolution in color brought about by the JPEG compression, we would have plenty of resolution to bring about an effective key.
We will see just how difficult it will be when we actually start compositing the pixilation characters and the backgrounds we are scheduled to shoot this coming Sunday (11-26). For the backgrounds Brad Hutchinson's and my own plan of attack is to acquire 32bit HDRI images to work with in After Effects (in which program we will be doing the compositing and animation), by shooting in RAW and bracketing 4-6 exposures of each image we take of background materials, and then using the "Merge to HDR" command in Photoshop CS2. While this may seem like overkill (and probably is), it will be an interesting learning experience. More updates on technical matters relating to the Trouble with Unicorns shoot to follow at a later time.
~Jed Smith - Editor, Visual Effects Collaborator
posted by Morgan the Unicorn @ 10:51 PM
![]()
![]()

0 Comments:
Post a Comment
<< Home